Français
 English
 Deutsch
 español
 Italiano
 日本語
日本語 Eλληνικά
 русский
 português

Every winter, thousands of matches are called off because the pitch is waterlogged . The Football Association (FA) estimates that around 120,000 football matches were cancelled last year due to harsh weather, while a third of community pitches are now unplayable for up to two months of the season due to flooding and waterlogging. In Wales, almost half of all fixtures between November and February were cancelled in a single 2024/25 season.
Most of those pitches do not fail because of the rain itself. They fail because the water has nowhere to go.
Good sports pitch drainage solves that problem. But it only works when every part of the system does its job. A well-designed pipe network is wasted if surface water cannot reach it. Perfect sand slits are wasted if the outfall is blocked.
This guide explains:
- how pitch drainage works,
- how primary and secondary drainage fit together,
- which materials to use,
- when to do the work,
- what it costs
- and how to keep it working for years.
It draws on more than 50 years of AFT Trenchers experience building drainage machines for contractors and grounds teams around the world, and on the work of the late Geoffrey Davison.
Geoffrey Davison was one of the first people in the world to study sports turf drainage in detail and write about it.
Why Pitches Get Waterlogged
Surplus water reaches a pitch in three ways:
- Rain falling directly on the playing surface
- Run-off flowing across the surface from higher ground
- Seepage moving sideways underground from surrounding land
Natural soil lets that water seep through slowly, and clay is especially slow. Only rare soils with 75% or more sand drain fast enough for regular play. Changing the soil is rarely practical: the top 200mm of an 8,000m² pitch holds around 3,000 tonnes of material.
Playing with studs and maintenance traffic makes things worse. They compact the surface and squeeze out the air spaces water needs to move through.
So the sensible approach is to let the soil grow the grass and build a faster route for the water. That route is the drainage system.
Primary and Secondary Drainage: Two Systems, One Job
Sports field drainage on most UK soils has two parts. Geoffrey Davison described them as two chains joined together. Each chain is only as strong as its weakest link, and neither works properly if the other is weak.
Primary drainage: the pipe network
Primary drainage is a network of perforated pipes laid in narrow trenches on a gradient. Smaller pipes, called laterals, collect water and feed it into a larger main drain. The main drain carries it to an outfall away from the pitch.
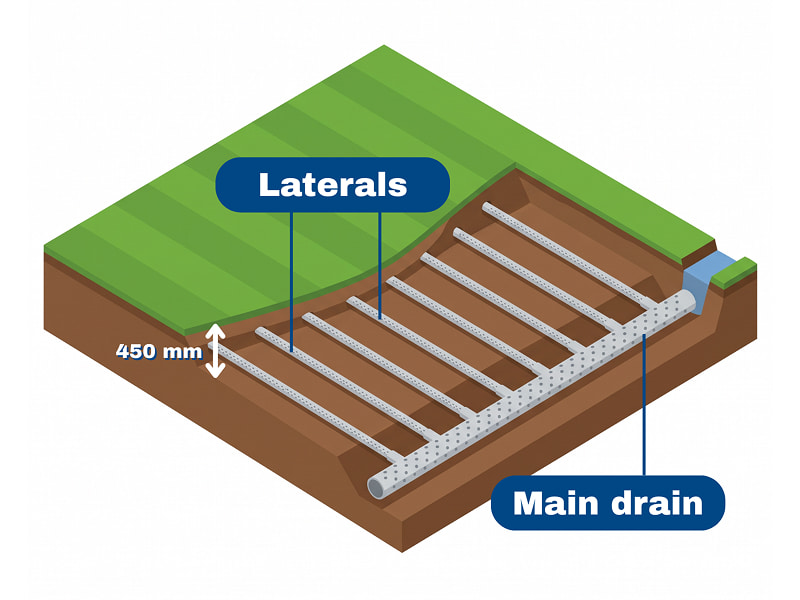
- Laterals are usually laid at least 450mm deep, with a steady fall towards the main.
- Spacing is calculated for the site. Closer laterals drain better than wider ones.
- Bigger pipes are not better. Laterals carry short runs of water, and oversized pipes flow slowly, which lets silt settle inside them.
- The trench is backfilled with pea gravel (gravel properties allow you to move water through the drainage system), then topped with sand (sand properties allow you to get water into the drainage system).
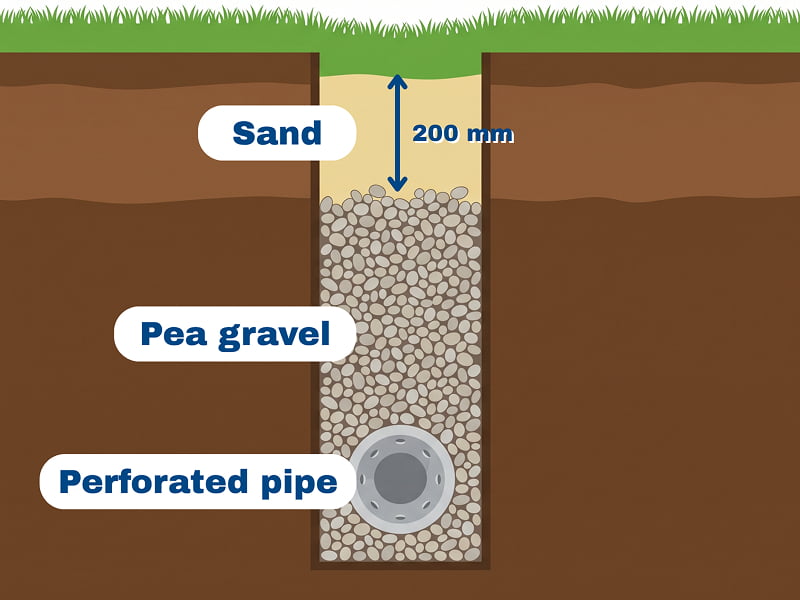
Primary drainage lowers the water table and clears water from the subsoil. On its own, it rarely clears the surface fast enough, because rain still has to soak through slow soil to reach the pipes.
Secondary drainage: sand slits
Secondary drainage gives surface water a shortcut. Narrow slits are cut across the laterals at right angles and filled with sand. Water drops into the sand, runs along the slit and into the gravel above the pipes.
The design can be to cut a slit :18 to 25mm wide and 130 to 200mm deep, at 200 to 300mm centres.
This grid pattern means water never has far to travel. Sand slitting only works if every slit meets the gravel over a pipe. A slit with nowhere to discharge simply fills up and holds water.
Start With What Is Already Under the Pitch
Many pitches already have an old drainage scheme. It may be partly blocked, poorly mapped or simply overwhelmed. Before designing anything new, find out what is there.
- Look for old drawings, inspection chambers and the outfall point.
- Walk the pitch during a wet spell and note where water sits. Wet stripes or patches often point to blocked or missing drains.
- Dig trial holes across suspected pipe lines to check depth, condition and backfill.
What you find shapes the whole project. A sound primary system may only need new sand slits to reconnect the surface. A failed one may need repairs, jetting or new laterals. If you are applying for Football Foundation funding in England, even smaller projects such as secondary drainage or reinstating an existing system need a feasibility check first.
Where Does the Water Actually Go?
A drainage system is only as good as its outfall. If water cannot leave the site, it backs up into the pipes and the pitch floods again.
Common outfalls include:
- A ditch, stream or other watercourse
- A surface water drain
- A soakaway, where no other outfall exists
A soakaway can work, but only if it is deep enough to reach a permeable layer of subsoil. Test this by digging a hole to the planned depth and watching the water level during a wet season. A test in dry weather tells you nothing useful.
The main drain must also be big enough for the area and rainfall it serves. Pipe manufacturers publish flow rate charts that make this easy to check.
Before connecting to a watercourse, speak to your local authority or drainage board, as permission is often needed.
Choosing the Right Backfill for Each Layer
Every backfill material has a specific job. Using the wrong one, or putting it in the wrong place, is one of the most common reasons a scheme fails. Our backfilling guide covers the wider principles.
Gravel over the pipes
Pea gravel or similar clean stone is the most durable backfill around the pipe. Larger stone has big gaps that fine soil washes into over time, slowing or stopping the flow of water.
Sand and root zone to the surface
Gravel should never be placed within 200mm of the surface, so the sand above it must be at least 200mm deep.
If the sand layer is too shallow, water hangs in it, held in place like water in a sponge. This is called perching. A deeper layer builds enough pressure to push water down into the gravel.
Never bring gravel right up to the surface. It clogs quickly, damages the soil and is a hazard to players.
What makes a good drainage sand
For sand slits, choose a sand that has been tested and shown to:
- Contain almost no particles larger than 1mm
- Contain no more than 0.2% fines (particles under 0.063mm)
- Have most of its particles in one mid-size range
- Drain at more than 1,000mm per hour (2,000mm per hour is exceptional)
Ask your supplier for a particle size analysis. A suitable sand can cost twice as much as a builder’s sand but drains five times faster, making it far better value.
Compaction matters
Loose sand settles, leaving sunken grooves that collect water and catch studs. Sand should be firmly consolidated as it goes in.
The Dual Use Hopper, with its gravel chute or sand-placement undercarriage and three levels of compaction, is an ideal backfilling tool. Without sand compaction, the sand will certainly sink later.
Protecting the Pitch While You Drain It
Drainage work should never leave a pitch worse than before. Heavy machines on soft ground cause ruts and compaction, which undoes much of the benefit.
- Narrow trenches disturb less soil, need less backfill and recover faster. Where a trench is filled with sand right up to the surface, keeping it no wider than about 55mm at the top means the grass on either side can grow across and close the gap by itself, so there is no need to sow new seed.
- A machine matched to the tractor, running on turf tyres, spreads the load.
- Conveyors load spoil straight into a trailer, keeping the surface clean.
- Well-consolidated backfill gets the pitch back into play sooner, often within 24 hours.
Matching the machine to the job
AFT’s range of sports turf trenchers covers every stage:
| PRIMARY DRAINAGE | |

AFT100
|

AFT45 with standard chain(Using a compact tractor)
|
| PRIMARY & SECONDARY DRAINAGE | |
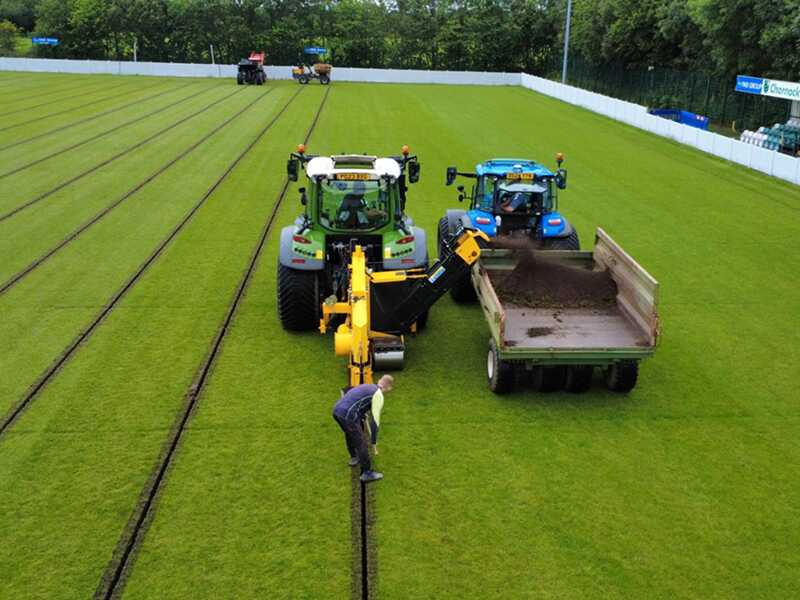
Wizz Wheel 55
(Up to 750 metres/hour) |

Wizz Wheel 75(Up to 750 metres/hour)
|
| SECONDARY DRAINAGE | |

AFT45 with narrow chain
(Using a compact tractor) |

AFT45 with digging wheel(Using a compact tractor)
|
| SAND SLITTING |

Sandbander
(Sand slits 25 or 40mm wide and up to 250mm deep, consolidated to full depth) |
| BACKFILLING |

Dual Use Hopper
(Backfilling alternatively with its gravel chute and sand placement under-carriage with three levels of sand compaction) |
Geoffrey Davison’s ideas inspired several of these designs, including the Wizz Wheel 55, the Sandbander and the sand placement unit with its three levels of compaction.
On the Colchester stadium project, an AFT45 dug primary drains at 150 metres an hour, while a Sandbander installed the secondary slits.
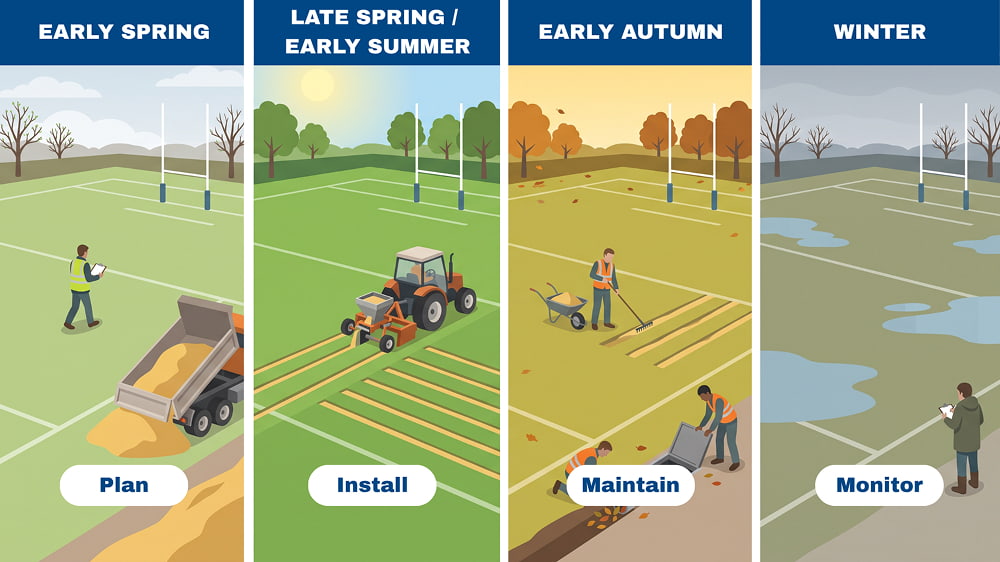
When to Drain: A Simple UK Calendar
Timing affects both the quality of the work and how quickly the pitch recovers.
- Early spring (before the last fixtures): survey the pitch, get quotes, and test and order sand. Order loads of at least 20 tonnes, as smaller loads cost more per tonne.
- Late Spring / Early Summer: the main installation window. The ground is firm, sand flows easily through machines and grass grows fast enough to heal trenches.
- Early autumn: top up any sunken slits, clear outfalls and check inspection chambers before the winter rain.
- Winter: observe. Record where water sits to plan next year’s work, and avoid heavy machinery on saturated ground.
 Very dry summers bring their own risk. Clay soils shrink as they dry, so a slit cut 50mm wide can open up to 80mm, leaving too little sand to fill it. Top up after any drought.
How Much Does Sports Pitch Drainage Cost?
The cost of sports pitch drainage depends on pitch size, soil type, the condition of any existing system, distance to the outfall, sand haulage and whether the work is done in-house or by a contractor.
As a benchmark, sportscotland puts a full-size 100m x 60m natural grass pitch with primary and secondary drainage, including turf establishment, at £80,000 to £140,000. That’s about £13 to £23 per square metre.
Gate receipts for a single game at a modestly sized football ground can be as much as £75,000 to £125,000!
Working out sand quantities
Multiply slit width by depth by total length to get cubic metres. One cubic metre of sand weighs about 1.8 tonnes, obviously depending on moisture content.
For example, 3,000 metres of major slits, 50mm wide and 300mm deep: 0.05 x 0.3 x 3,000 = 45m³, or about 81 tonnes. Order a little extra to allow for spillage.
Funding and phasing
In England, the Football Foundation offers grants of up to £25,000 for grass pitch drainage, covering up to 75% of the total cost. Piped schemes must be designed by a qualified sports pitch consultant.
If the budget is tight, drain part of the pitch properly rather than all of it poorly. On a football pitch, the central strip from goalmouth to goalmouth takes the most wear, so treating that third first gives a big return.
Contractor or in-house?
For a large new scheme, use an established contractor. Get at least three quotes and be wary of any that look unusually low. Ask each contractor for case studies of similar projects and for references you can contact, ideally from clubs or grounds with similar soil and use. For phased work and ongoing maintenance, owning suitable machinery lets your team choose the best weather and timing, with no transport charges.
For phased work and ongoing maintenance, owning suitable machinery lets your team choose the best weather and timing, with no transport charges.
Maintenance: Keeping Every Link Working
No drainage system lasts forever without care. Over time, fine particles creep into the gaps in soil, sand and backfill. At the surface, this is called capping, and it gradually seals the tops of the slits.
A simple routine keeps the system working:
- Keep outfalls clear, whether they discharge to a ditch, silt trap or soakaway.
- Check inspection chambers, especially at major changes of direction.
- Investigate any new wet patches, as they often signal a blockage.
- Top up sunken slits with matching sand.
- Aerate properly by coring or lifting the soil. Spiking alone just squeezes the soil around each hole.
- Topdress with a matching sand after decompacting the surface.
- Reconnect a capped surface with new, closely spaced sand slits at right angles to the old ones.
Most of this work can be done in-house, when conditions suit and time permitting.
Drain It Once, Look After It Always
A pitch that drains well is a pitch that stays open. The principles are simple, even if the detail matters:
- Primary and secondary drainage work as a pair. Slits must connect to the gravel over the pipes.
- Check what is already underground and where the water will go before you start.
- Use pea gravel over the pipes, at least 200mm of tested sand above it and never gravel at the surface.
- Keep trenches narrow, clean and well consolidated to protect the playing surface.
- Install in summer, observe in winter and budget for maintenance every year.
Get every link right and your sports pitch drainage will keep water off the surface and players on it for many seasons. To find the right machine for your pitch, contact our team or speak to your local AFT dealer.
Before commencing any work, check for underground utilities, floodlight cables, etc.